Uploading Content (Sims 4)
Uploading your Sims 4 Custom Content to ModCo is quick and easy, and this article will guide you step-by-step through the process!

Please note that this article was originally written pre-release, and screenshots are taken with admin permissions enabled. Some buttons may not be available from the Artist view of the system. Images and instructions will continue to be updated as necessary.
Upon opening the system, here's the main "home" screen you'll be see.
(Note: As an artist, you'll only be able to see your own creations.)
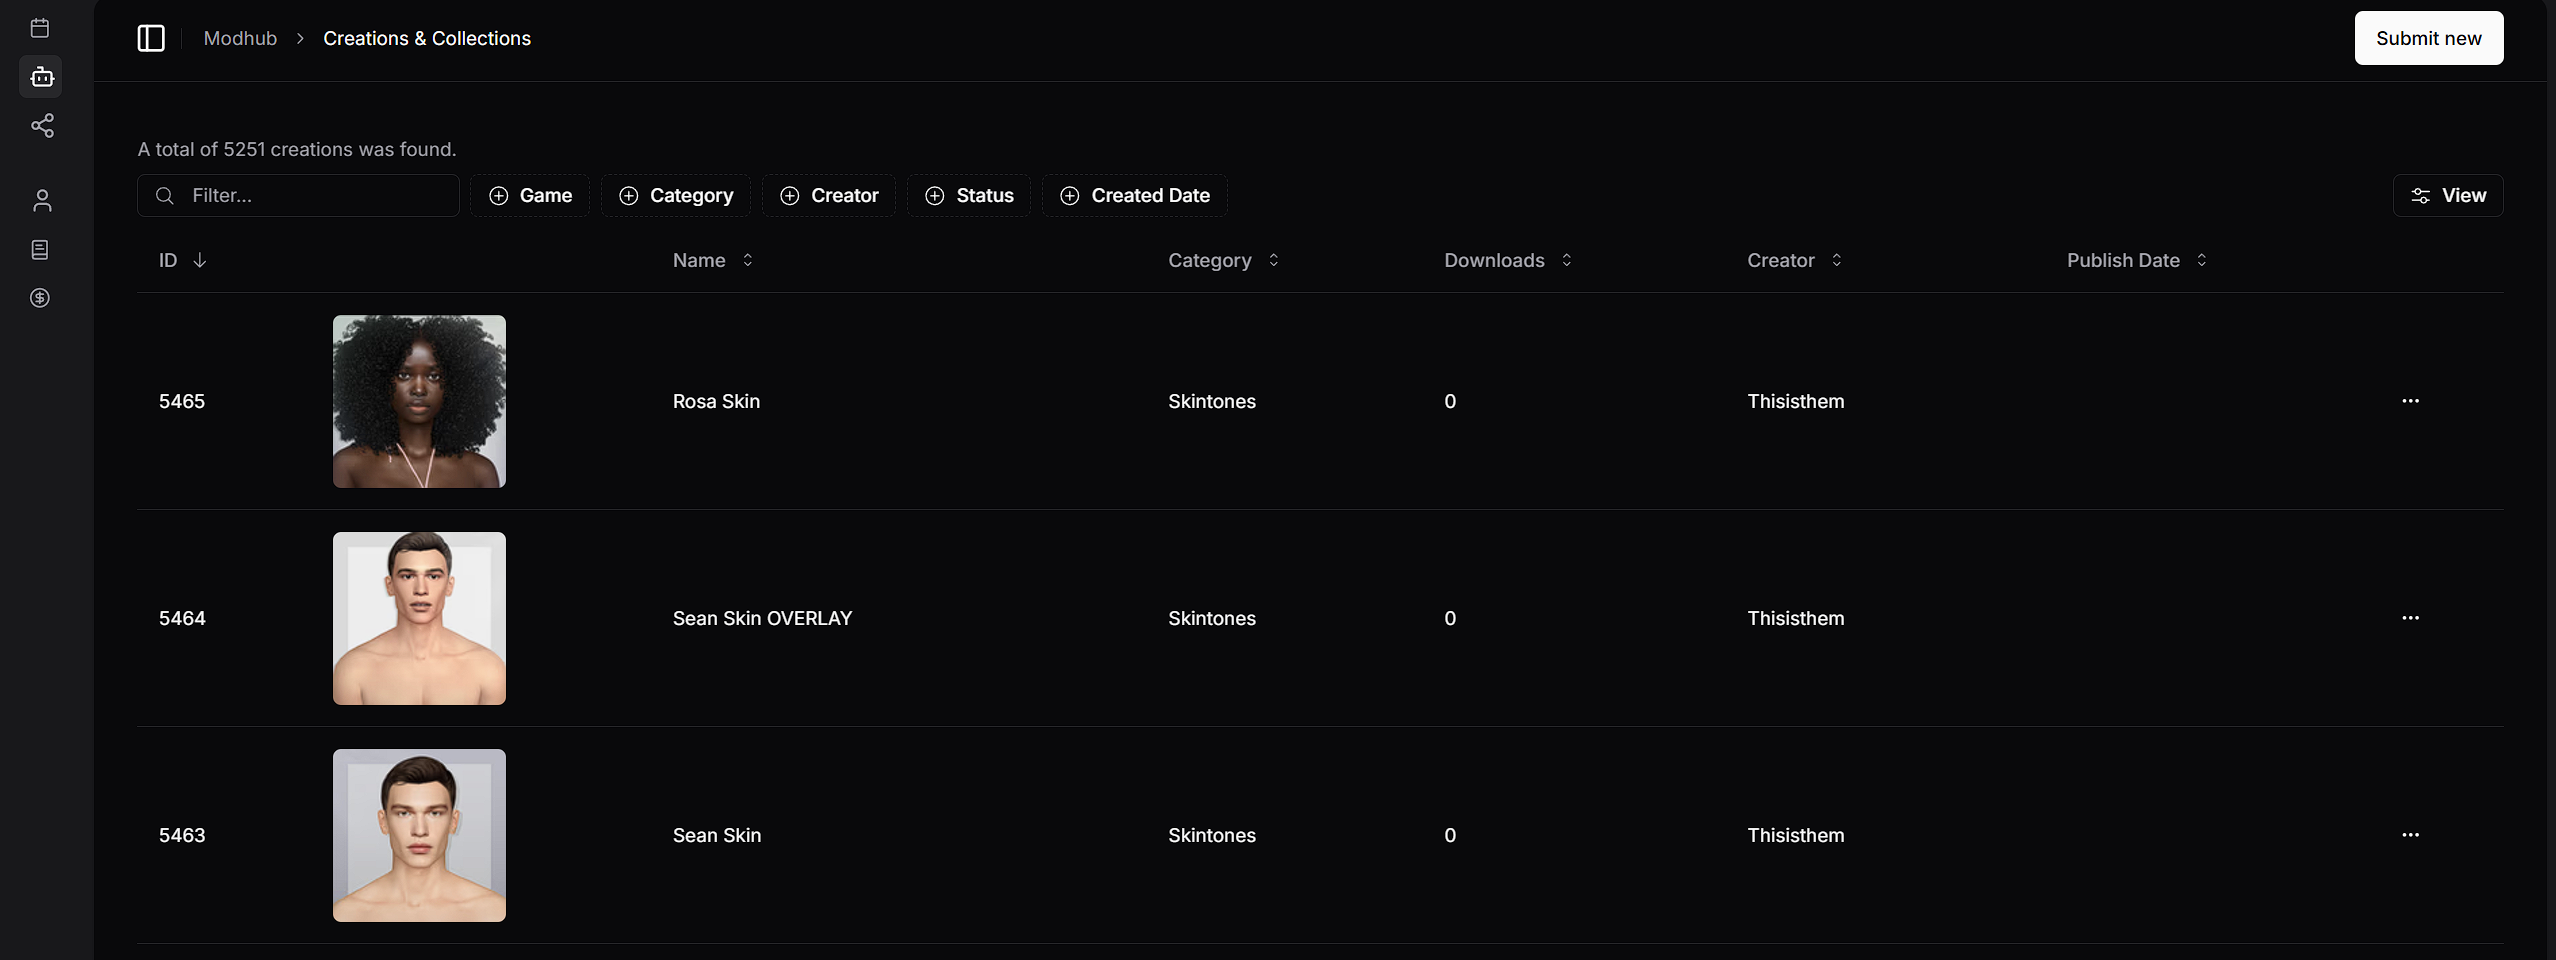
Collections & Creations
There are two main "types" of content: Creations and Collections
- A Creation is a singular piece of content. A creation can be part of a collection, or it can also just a stand-alone item by itself. All Sims 4 items published on the site, whether part of a collection or not, are a "Creation."
- A Collection is a larger grouping of content, containing multiple single creations. If you have several items that are intended to be used or distributed together, then those items will be part of a collection.
You can choose which type of content you are viewing by expanding the menu from within the MODhub Console, as highlighted here:
Submissions will show everything that has been attached to your artist profile, regardless of whether you've uploaded it, or if staff had originally uploaded it for you. This includes all collections and creations.
Creations will filter the view to only show single creations.
Creations will filter the view to only show single creations.
Collections will filter the view to only show collections
These tabs are simply for organizational purposes - when uploading new content, it does not matter which tab you are in, the system will automatically know if you are uploading a collection or a creation based on if you're adding multiple files or not.
To upload something, click on the "Submit New" button at the top right of the window.
This will take you to a page that looks like this:
The first steps on this page are to set the details at the top of the page. Currently, these are:
- Game - At the moment, we only have content for Sims 4, so that's the only option. (BG3 will likely be the next addition!)
- Creator - This will automatically default to you, so you won't have to change this.
- Submission Type - You'll need to indicate if this is an Exclusive creation, or a Remix/Cross-Post.
To start the actual process, you'll need to collect all of the files and images for your creation, depending on what you are uploading, and then drag and drop them onto the gray area.
Single Creation
A single stand-alone item that is NOT part of a collection, you'll need:
- A package file for Build/Buy/CAS content OR appropriate tray files for a Lot, Room, or Sim (Note: The system expects the individual files, unzipped, and not in a folder.)
- A single browse image (400x400 pixels)
- At least one gallery image (This image will be displayed at 1600x900, but the standard size of 1920x1080 is also acceptable, as a more common resolution for game screenshots.) You can have multiple gallery images!
Select your package file and images, and simply drag and drop them onto the gray area that says "Drop Files Here"
The system will then automatically (and instantly, no processing time!) identify your images and attach them to the package file, creating this form for you to enter the details of your creation:
If you are uploading a tray file creation, then you'll instead gather all of images and tray files:
Select all files and images, and drag and drop them onto the upload area. All of the individual files will be added to the download, with a note that they will be combined into one .zip automatically.

Uploading a .zip file into this quick-upload form may not work, you may have to upload individual files.
If your lot includes any .package files, you'll have to add the .package file separately. Drag the tray files in first, then drag any .package file(s) needed and they'll be added to the list. (If you include the package files to start with, the system will incorrectly try to split the files into a collection.)

Note: We only allow .package files to be included in a lot in extremely specific circumstances, such as when A) a file is no longer available for download anywhere, and B) the original creator has given us permission to host those files. For any other cases of used CC, you should use the "Required" section to add links to whatever you've used.
You can add and remove files at any time
(Again, note that the "Creator" field will automatically be locked to your own artist ID.)
You simply need to enter the Name of your creation, choose the category, enter a description, and then add any relevant Tags or Keywords.
A few tips:
- Try to keep the name of your creation short. Visually, we've found that titles under 4 words seem to look the best on site. (Do not put your name in the title.)
- Please give your creation a proper name, not just an ID number. "Moonstone Lipgloss" is a much better name than "Lipgloss 1" or "Lipgloss_AF_R405B," for example.
- Our category structure is not a 1-to-1 match for the categories in the game. You can choose the category based on the in-game functionality/location of the item, or based on what the item actually is. We realize that you may often create something that can't easily be categorized by the game rules, so feel free to choose whatever you think makes the most sense for your item.
- Keywords and Tags: Do not put your username as either a keyword or tag.
- Keywords:
- Tags:
If you notice that the images are not the correct type, or are not in the correct order, that can quickly and easy be fixed as well.
To rearrange the sequence of images, simply drag and drop the images around within the "Images" section. If you drag an image and drop it on top of another image, the other images in the creation will shift accordingly to fill in the gap left by the image you are moving. Images will appear in the Gallery on site in the same order as they are listed in the creation.
Note: The location of the "Browse" image does not matter. If you have multiple gallery images, however, we would suggest that it may be easier to organize them with the Browse image moved to either the first or last position.
The system will automatically assign the type of image based on the dimensions of that image. However, if you find that any images have been assigned the wrong type, you can change the type of image by using the drop-down menu underneath of each image to assign it to either a Gallery or Browse position.
Once you are done filling out the details of your creation, simply click on the "Submit" button at the bottom, and you're done!
Uploading A Collection
If you are uploading a set of multiple items, then you'll be uploading what we refer to as a Collection. For this, you'll need some assets for the collection entry itself, and for the individual items:
For the Collection:
- A single Browse image (400x400 pixels)
- At least one Gallery image (Displayed on site at 1600x900, but can be 1920x1080 as an easier option for a more standard game-resolution option.)
For each item within the collection:
- A package file
- A single-item image. This image should be sized at 1024x768, and should feature your content on a transparent background. The exception to this would be for makeup (or other genetics) that can't easily be isolated on a transparent background. The single-item images should be named to match the package file they correspond to. This will allow the system to automatically attach the images to the matching file.
As our example, here are the files that will be used for our fake collection:
To start uploading the collection, simply grab all of the files, and drop them onto the Upload panel where it says "Drop files here to upload." The system will then automatically (and instantly!) sort through your files, create an entry for the collection, an entry for each individual item, and it'll automatically pair up the images with their corresponding package files.
The set entry is listed at the top, and then each individual item is listed underneath of that.
For the set/collection entry, it requires the same basic information that a single creation would: a name, a category, a description, tags, keywords, and images.
For the name of the collection, please give it a proper name/title that is:
- Not a number or ID code,
- Not your creator name.
For example, a title like "Olivia Outfit Collection" or "Buttercup Kitchen" are good, simple names. A title like "Makeup_AF_N255," which while that kind of title may make sense to you as the creator, is not a good name for users. For visual aesthetic purposes, we've noticed that names generally display the best when kept to under 4 words. (This is not a hard rule, but we may adjust names to be shorter if we notice they are too long to display correctly.
Categories

NOTE: For Set/Collection categories, we have begun placing them under whichever Build, Buy, or CAS category is most fitting, depending on the type of content in the set. Some examples:
- A set of varied clothing items from multiple in-game categories would be placed in Create A Sim > Clothing
- A set containing mixed CAS content, such as clothing and accessories, would be placed in Create A Sim.
- A set of varied living furniture for a room (living, dining, bedroom, etc) from multiple different in-game categories would simply be placed in Buy.
- A set of same-category objects, such as a set of lights, would be placed in Buy > Lighting.
This ensures that users can see ALL applicable content when diving into a category, without having to look in a separate area to find Collections. Even though there is a "Set" category/subcategories, we are not using it at this time.
In order to place an item into a broad parent category, simply expand that category, and then click on it at the top of the categories panel to select it:
Individual Items
The individual creations within the collection will require the same general information as the collection - a name, category, description, tags and keywords, and images.
The Name will automatically copy from the name of the package file so that you can easily identify which item that is. However, you'll most likely need to change the name to be something more presentable. Remember, the title should of a creation should:
- Not contain your username
- Be short, about 4 words or less will ensure that the titles display properly on site.
- Be something more than an ID number. "Red Rose Lipstick" is a good name, "Lipstick 47" is a bad name.
When setting the Category, you can place your creation into whichever category you feel is most appropriate. We realize the game categories are not always accommodating for what you may have made, and we've simplified our categories a bit compared to the full in-game category structure. Feel free to choose a category based on either the in-game function of your content, or in some cases you may want to choose the category based on the literal design of what your content is.
A Description is required, but there are not any specific rules for what you have to include in it. If your content has any "good to know" type of information, then it's a good idea to include that in the description. You can also include game-related information, such as where it's found in game, any in-game functions it has, how many swatches it has, etc. Otherwise, you can even use AI to write descriptions for you! Many AIs can now read images, and there's also a free, unlimited-use description generator here.
For Tags and Keywords, while they are similar, you can think of them as tags being more for traits and properties of your content - things like color, patterns, materials, etc. Keywords can be used for more general terms. For example, a piece of furniture might have tags such as "fabric," "floral," and "patterned," while the keywords would be more general terms like "lounge," "cottagecore," "vintage," etc.
When looking at your images for a single item within the collection, the system will automatically make your transparent background image both the Browse and Gallery image.
This is correct - you do not need a separate Browse image for each individual item. This image will actually be displayed in three locations: when users are browsing the catalog, the details page of an item, and the listing of items within a collection
You can add multiple Gallery images to an individual item within a collection, however, the transparent background image must be the first one in order to ensure proper display everywhere on the site.
Images for Makeup & Genetics
The exception to this image rule would be makeup & genetics, which oftentimes cannot easily be shown on a transparent background. Some creators may choose to create a small thumbnail image to use as the transparent background image, or in some more recent cases, we've simply switched to using the standard method of a dedicated browse image, and a standard gallery image instead.
For example, using full gallery images instead of the transparent background image will result in the collection contents displaying in a much easier-to-view manner:
However, since the standard 1920x1080 gallery image cannot be used for the 1:1 browse image, this method will then also require a separate 400x400 Browse image to be created for each individual item in order to ensure that the image fits our catalog 1:1 ratio:
Editing Creations & Collections
Once a creation or collection has been uploaded, it'll now sit within the main Creations and/or Collections heading. If you are uploaded a collection, then the individual items will be listed under Creations, and the collection itself will be listed under Collections.
A "Collection" entry, listed under "Collections"
The individual items within that collection, listed under "Creations"
Any item you have uploaded can be edited by clicking on either the ID number of the creation on the left, or by clicking on the image. The "..." button on the right will also give you an option to "View" the creation. Once you are in the edit screen, there are several extra fields where you can provide additional information.
Common
The main page will be the "Common" tab, as shown here. (Note: This creation is a collection, so it displays a "Creations" tab. Single item creations will not display that tab.)
Aside from the name and description, you can also enable or disable comments and likes for this creation from this page.
Details
The Details page provides a few additional fields:
Display Name - this allows you have two different names for a creation. If you enter anything in this box, this will override the name of the creation on site when published, while the original name of the creation will remain visible within the content submission system. If you leave this blank, then the common Name of the creation will be used everywhere.
Required Downloads - if you have used other creations in your content, you can add URLs to that content here. When users attempt to download this item, they will be prompted that it requires these additional items.
Number of Polygons - if your creation contains a 3D mesh, you can (optionally) specify the polygon count here. If you do, note that this should be for the highest LOD in your item. (Note: we plan on having polygon information automatically extracted from the file in a future update.)
File Size - Self-explanatory, this is the size of your files, but specifically in bytes. You can ignore this, as the system already tracks file size.
Creations (Collections Only)
Because this creation is a Collection of multiple items, it displays a "Creations" tab.
This tab simply shows you which items are part of this collection. You can:
- Remove an item from the collection, by clicking the "X" in the top right corner of that creation
- Add an existing creation to the collection by clicking the "Add Creation" button, and inputting the ID of the creation to be added. (Note: the system allows for collections to be added into other collections, but currently, this is mostly for staff to be able to add content into our larger themed/seasonal collections.)
Images
The next tab is "Images," which lets you add, remove, or re-order any images that are in your creation.
From this page, you can drag and drop new images onto any area to upload them to that section, or you can also use the "Add Images" button to open a file browser window. Images can also be moved around between sections via drag and drop. If you have multiple images in one section, they can be rearranged by drag and drop within that section as well. If you need to remove an image, you can do so by clicking on the "X" in the top right corner of that image.
(Note: The "Spotlight" section for images is currently not in use, so you can leave this empty.)
Files
The "Files" tab will show you any files currently associated with this creation.
Here, you can add and remove files from being associated with this creation.
Note: The "file" for a Collection is automatically generated. The system creates a .zip of all individual files that have been uploaded as single Creations within this Collection. If you manually add or remove something to a collection after it has been created, you may need to manually upload a new .zip file to include whatever files are needed for that new addition to the collection.
You can use the "+ Add File" button above the file listing to add any additional files to the download.
The "..." menu on the right side of the listed file(s) will give you options to either Download the file, Remove the file, or copy the ID number of the file.
Statistics
The Statistics section will show you a simple bar graph that displays both downloads and page views for this creation, each also separated by subscribers or free users.
This display can be adjusted to show different time frames using the dropdown menu at the top, with options for the past 7 days, 30 days, 3 months, 6 months, and year.
Manual Uploading - Misc. Content
For other types of content, such as scenes in .blend files, you'll need to use the Create From Scratch option.
NOTE: If you use the Create From Scratch method to upload Tray files, those files must be zipped!
This will take you to a page where you'll have to enter some basic details about what you are uploading:
You'll need to provide:
- Category
- Submission Name
- Description
- Type of Content - either Single Creation, or Collection
Once those have been filled out, you'll click the "Continue" button at the bottom of the page. That will create the submission for you based on the type (single item or collection) and will then take you to the editing page, as displayed above in the Editing Creations & Collections section.
You'll have to manually go through each tab to fill out any required information. The Name and Description will carry over from what you've entered upon the first "Create From Scratch" screen, and the Category will as well. However, you'll still need to make sure you add the following information:
- Details - Tags/Keywords, and Required Items if applicable
- Images - Add the appropriate Browse and Gallery images
- Files - Use the "+ Add File" button to upload your file. This manual file upload should accept any type of file, just note that large files (such as .blend scenes) may take several minutes to upload.
- For Tray-based content (lots, rooms, sims): Upload all of the files for your content as a .zip. If you try to upload individual files here, the system will not save them and your download will be empty!
Once your content has been successfully uploaded, that's it! There is no submission pending or approval process - our staff will automatically be pulling a small number of creations each day and publishing them. However, even without an "official" approval process in the system, we do check through content in order to make sure everything is up to standards. If there are any issues with either the submission (such as incorrectly sized images) or issues noticed with the content itself, someone from staff will reach out and work with you to get any issues resolved.
Related Articles
The Sims 4 Content Guidelines
While we want to ensure that you all are free to create the incredible content that you're known for, we also want to make sure that we are providing top-quality content to our users for all of the games that we support. With that in mind, we have ...Copyrighted & Trademarked Content Policy
Copyright and Trademark - What is it? Copyrights and trademarks, in most of the world, offer protection over creative works in terms of how and where those works can be used. Any content that is published on, or is otherwise part of ModCo, must ...Polygon Counts
Polygon counts MODCo believes in users deciding what users have in their game. We're not going to police polycounts, but we will use a labelling system on-site to alert users on whether content will work on their computers so users can decide for ...About MODCoins
MODCoins are generally used on the site for users to unlock downloads or remove restrictions normally placed on free users. They can be purchased in packs or earnt for free by sharing links to our content. Your current MODCoin balance can be found in ...ModCo Referral Scheme
We operate a referral scheme at ModCo that will help you earn more money using your socials and our content! The scheme is open to all our artists and influencers, and anyone else who has a large audience with which to share! The scheme pays: $0.01 ...