Rendering Tutorial
ere is the rendering tutorial for your marvelous creations! Just a guide if you want to take renders of your creations.
First Steps
-Extract your sims from game

To do that, you need to download the updated version of TS4 Sim Ripper.
How to use TS4 Sim Ripper
-Create a sim in CAS and place it in a town and save the game.
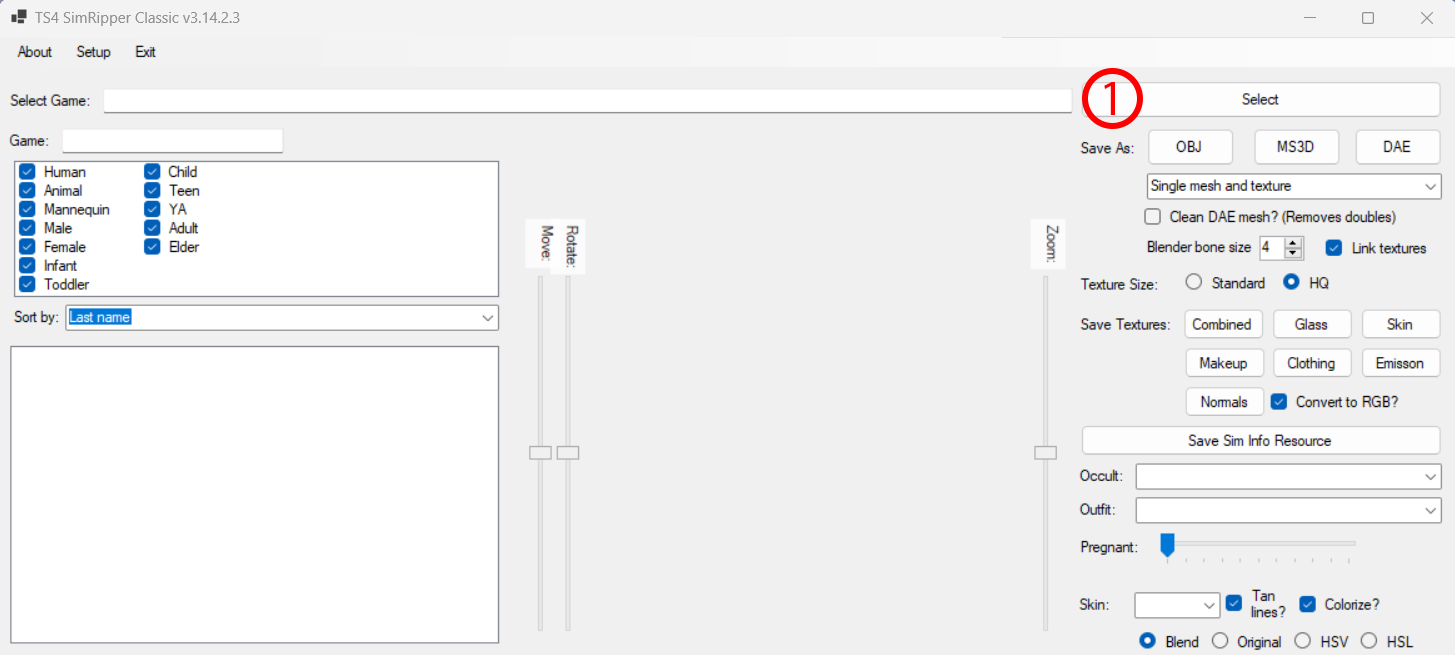
-Open TS4 Sim Ripper
1. Click to Select button
1. Click to Select button
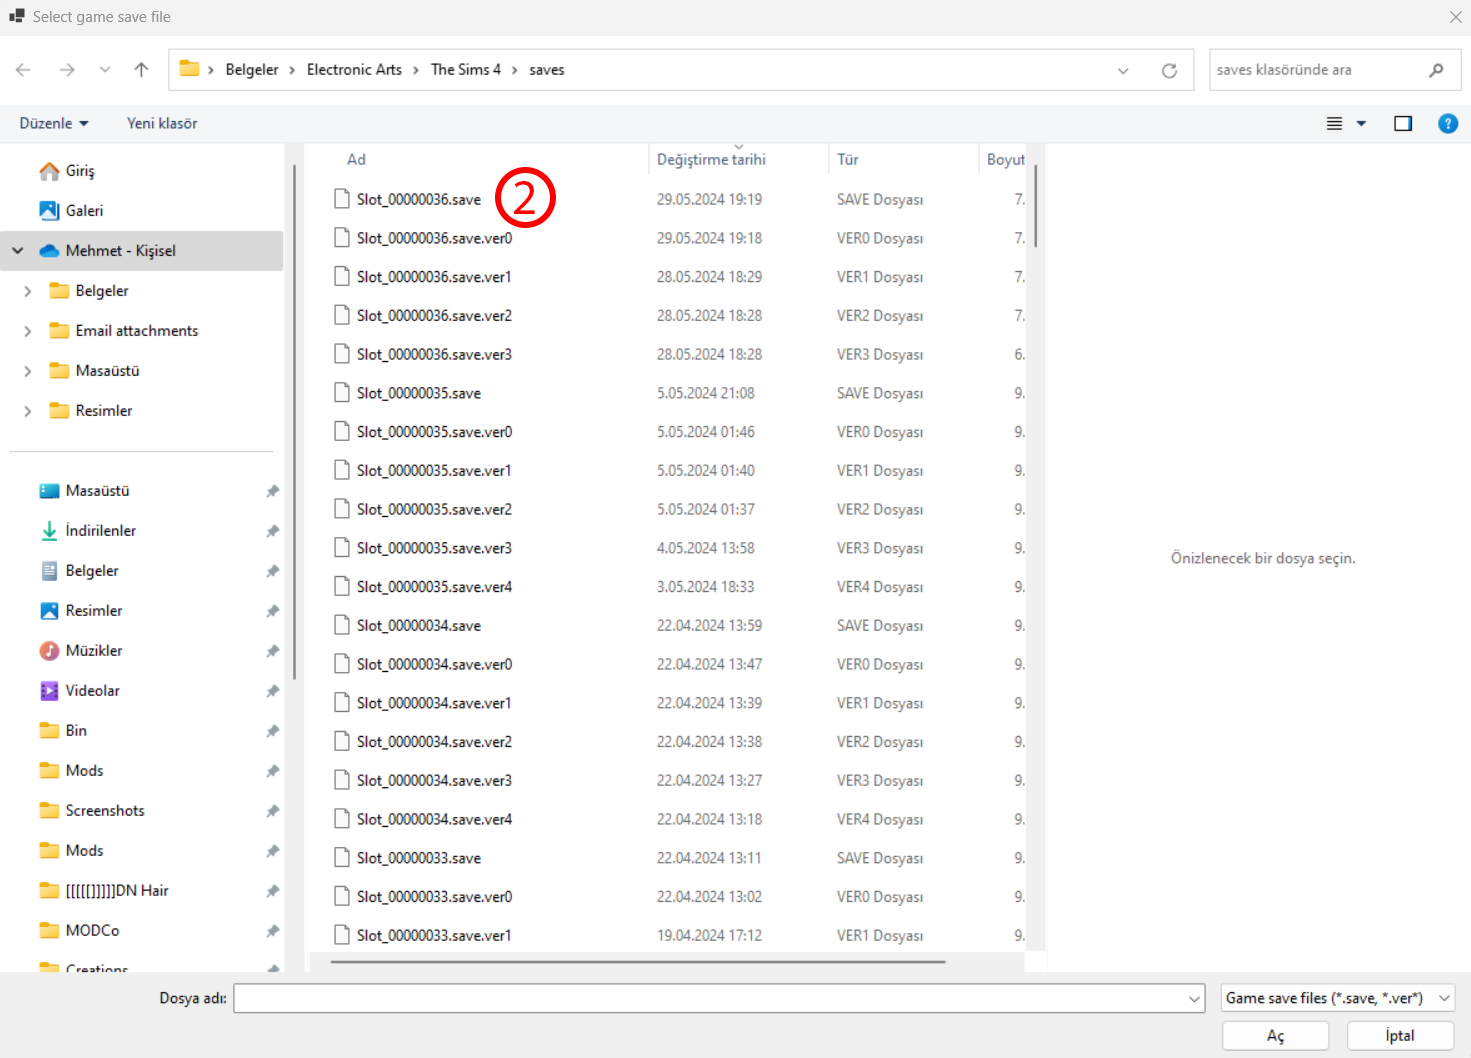
2. Select your latest Save file with select button:
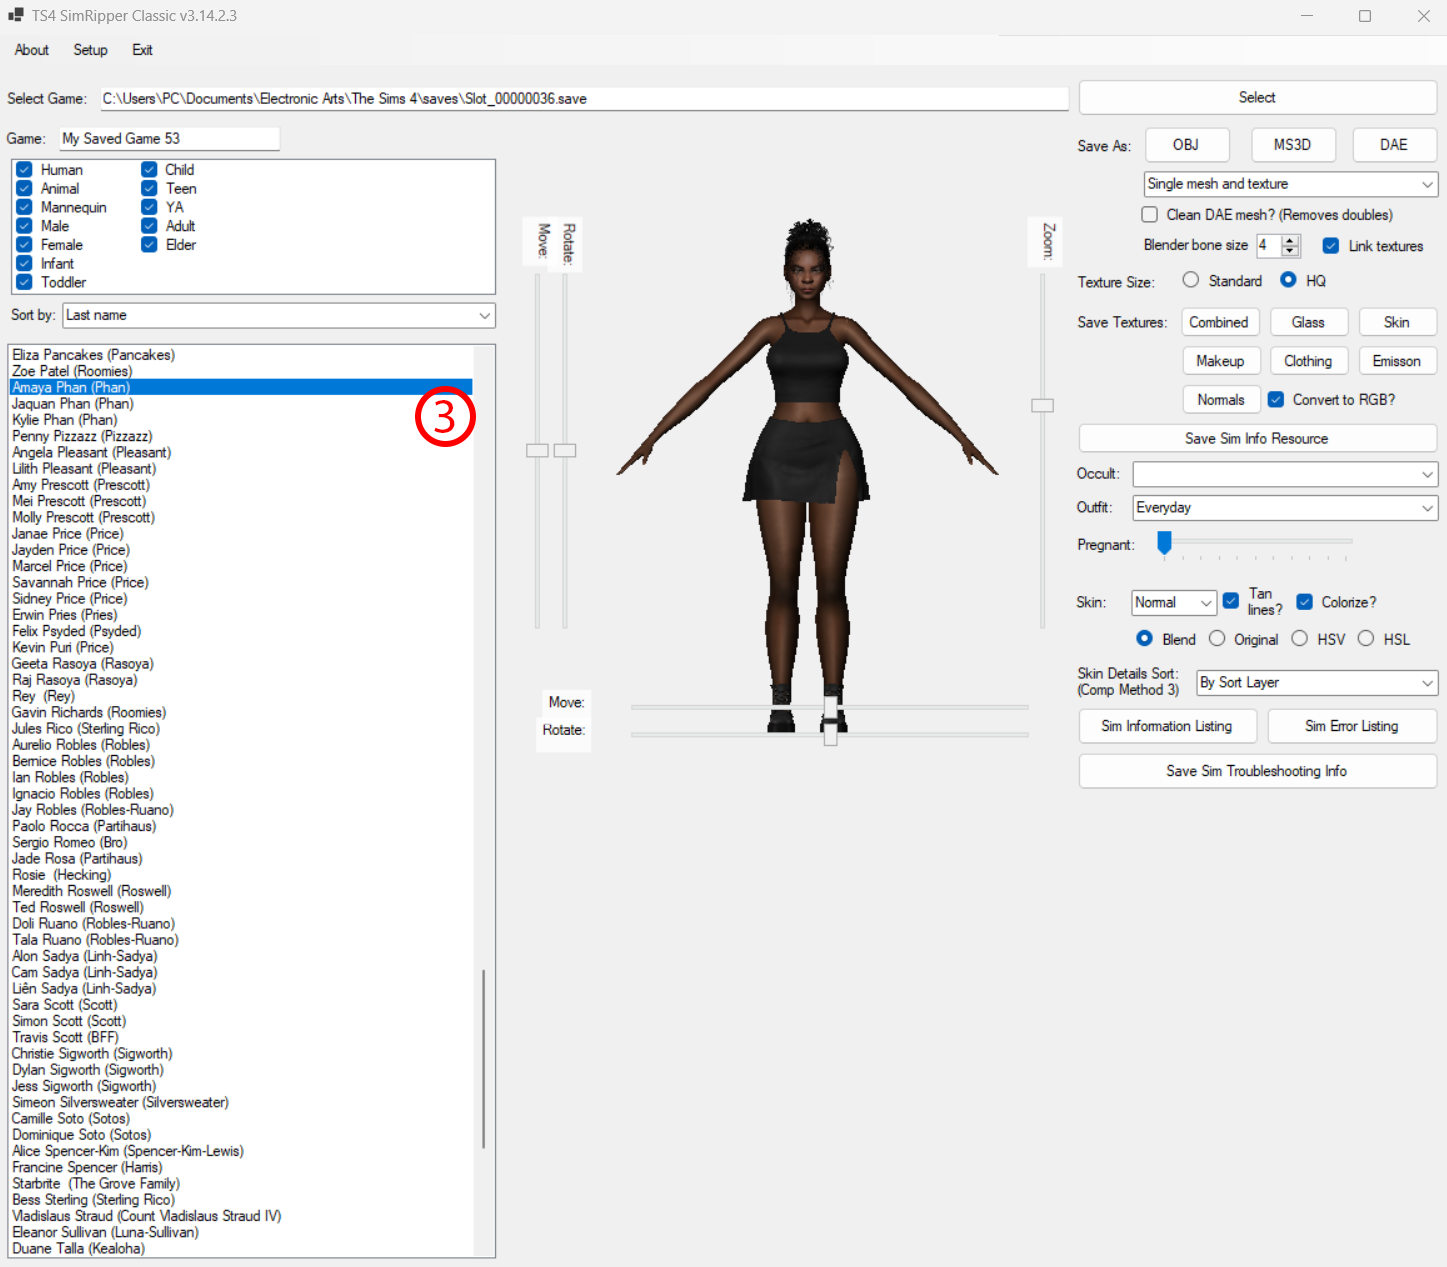
3. Find your sim on the list and click on it.

(TIP: You can rename your sim like 0000 AMAYA 0000, with this way you can find it easily on the list)
4. Click to DAE button if your sim have the right outfit and export your sim as .DAE with those settings and save it to a folder.
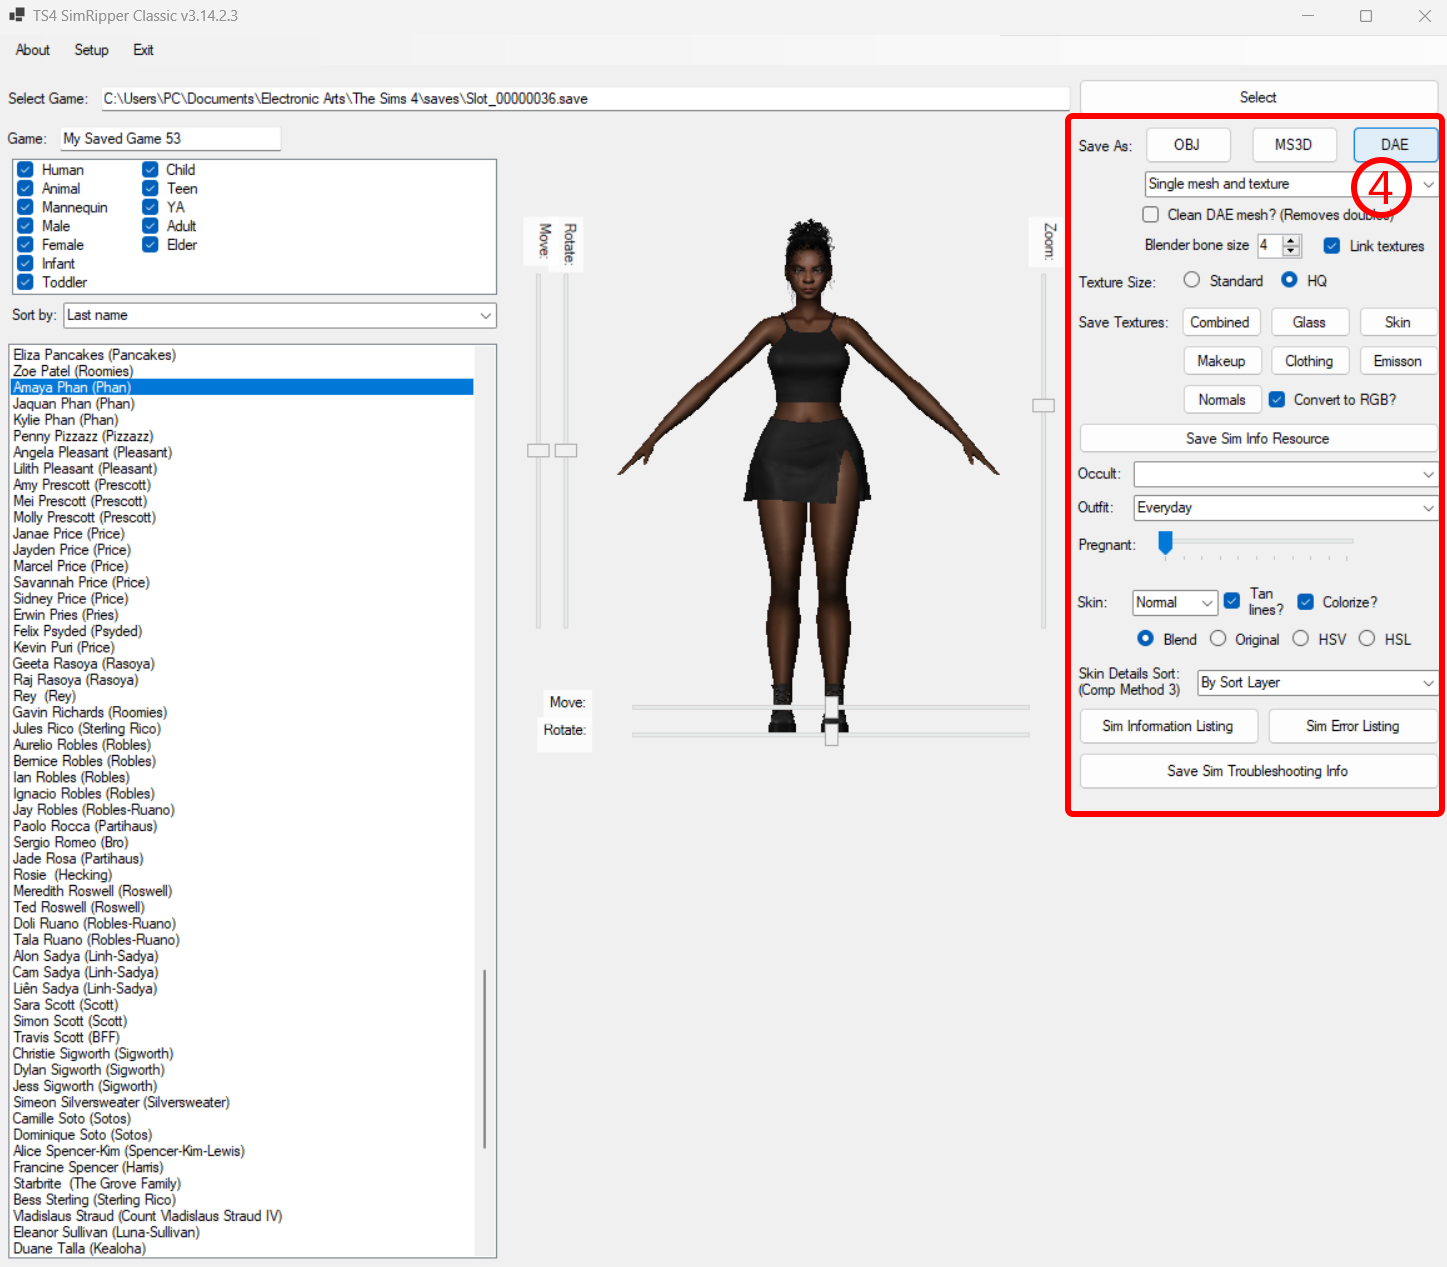
-If you check Clean DAE mesh, it will automatically merge all vertices and this may cause some artifacts in Blender.
-Save Textures area is for textures only (if you want to export textures only)
-Importing into Blender
If you are using the latest version of Blender (currently 4.1.1), you can simply drag and drop your DAE file into Blender, or you can follow this path
File / Import / Collada (.dae)
If you use the drag-and-drop method, don't change anything on the popup and click "Import Collada".
-RENDERING (EEVEE)
Setting up the Scene (Transparent Background with Manual Lights)
Setting the Transparency
Once you have imported your Sim, you can start setting up the scene.
First, split your scene into 2:
And change the left one to Shader Editor (do these steps if your sim has an alpha hairstyle or eyelashes or clothes with transparency).
Shader Editor should look like this:
Follow these steps to apply transparency to your material:
In the Shader Editor
1. Click Add (Shift+A)
2. Type "Mix" in the search bar and select "Mix Shader" and place it between Principled BDSF and Material Output.
3. Connect the BDSF node of Principled BDSF to the second shader node of Mix Shader.
4. Click Add (Shift+A) and type "Transparent" and add "Transparent BDSF" to an empty area.
5. Connect the BDSF node of Transparent BDSF to the first shader node of Mix Shader.
6. Connect the Alpha node of the Base Color to the Fac node of the Mix Shader.
and we are done!
Go back to the right viewport and switch to the Material Preview.
We still don't have transparency in the viewport. To fix this, go to the Materials tab on the right panel and change the blend mode to Alpha Hashed.
Now we are ready to setup a basic scene (lights and background)
Adding Lights
Now we are ready to add some lights, but first let's take a look at the rendered version of our scene.
To do this, simply change the Viewport Shading from Material Preview to Rendered. This is because we don't have any lights in our scene.
To do this, simply change the Viewport Shading from Material Preview to Rendered. This is because we don't have any lights in our scene.
(Those white dots are from the rig, they won't be visible on the actual render).
It's time to add some lights, for this, you can use:
Add-Lights menu in Blender, there are many light types. I use Point Lights.
And you can change light color and other settings
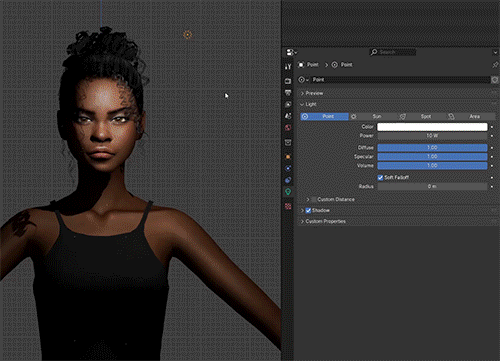
I set up some lights to give a simple lighting effect for the face only render:
Adding Camera for Rendering
Now we're ready for a simple render. We should add a camera to our scene. To do that:
You can use the Add menu and select Camera
You should add the camera while on the front view because if you add it from another angle, the camera should be at that angle.
After adding the camera you can press numpad 0 to toggle camera view or simply select camera view from the right menu:
As you can see, the camera angle is not correct. We should move it before switching to camera view
To do this, I switch to left/right angle in the viewport and simply move the camera:
You can the change camera dimensions or camera type:
You can set any dimensions or select any camera type.
We're going to press F12 to take a render, but if you want to take the render with a transparent background, we should change one last setting:
(You should go to the scene settings and check the Transparent box on the Film tab)
On the same tab you can see the Sampling tab at the top. This is not that important for the EEVEE renderer, but it will be important for the Cycles renderer.
On the same tab you can see the Sampling tab at the top. This is not that important for the EEVEE renderer, but it will be important for the Cycles renderer.
One more thing before hitting F12, as you can see at the bottom, there is an Output tab. Here you can change the export settings (like image format, color depth..etc.).
LET'S HIT F12!
And here is the result for a simple render! We're almost done with the basic part.
Of course, we won't be rendering with this A-pose, we should add some poses to our scene.
Posing
To do that, we should export a pose from Blender. Here are the steps:
-Pick a pose package (All-in-One poses are great for this)
-Open the pack with Sims 4 Studio
-Go to the "Clips" tab
-Select the pose you want to export
-Select Rig Type

You should choose the right rig type for your poses.
In this case, our pose is for Adult-Female, but you should change it when exporting child poses
-Click "Export"
-Save .blend file
Now go back to Blender and append the rig of the poses
-File / Append / [PosePackName].blend / Object/ rig
-File / Append / [PosePackName].blend / Object/ rig
New rig will come with .001 at the end because we already have our base rig, you can just select the new one and rename it to find it easily.
Now select your model again and go to the Modifiers tab in the right menu. There should be an Armature modifier, we are going to change our model's rig to our PosePack rig to do this;
-Click on Rig in the Armature modifier and select PosePack1.
Now our model should have a pose, if not just hit play or change the timeline frame (you can also use the timeline to change poses if you are using an all-in-one pose pack):
Here are the a few EEVEE renders with poses and different lights:
Here comes the fun part!
-RENDERING (CYCLES)
Almost all steps are the same for the Eevee renderer. But I will add some notes to some steps:
Setting the Transparency
All steps are the same with the Eevee process, but;
You can see some artifacts on transparent areas:
To fix this:
Select just hair mesh and separate
Select just hair mesh and separate
and then follow these steps:
Mesh / Clean Up / Merge by Distance
Mesh / Normals / Recalculate Outside (Shift+N)
Mesh / Clean Up / Merge by Distance
Mesh / Normals / Recalculate Outside (Shift+N)
And Voila! The problem has gone!
You can face with one more problem about transparency, which is:
This issue also have a simple solution,
Just go to Render / Scene Menu and find Light Paths - Max Bounces and increase the transparent value:
Just go to Render / Scene Menu and find Light Paths - Max Bounces and increase the transparent value:
The other 3 steps are the same for the EEVEE renderer. I'll add some details to the lighting and rendering examples while talking about custom scenes.
Before we get to the custom scenes step, save the current Blender session because we're going to use it to attach our model to our scene.
Using Custom Scenes
BlenderKit ( )
)
BlenderKit is an add-on for Blender that allows you to easily use custom scenes in your application. You can easily find ready-to-use scenes. Some are free, some are not.
To use a BlenderKit scene, you need to install it first and then it will appear at the top of the Blender interface. (You can find the installation instructions on the BlenderKit page)
Now you can find custom scenes directly in Blender and download them with 1 click:
Most of the custom Blender scenes use the Cycles renderer which is much better for rendering and when you download and append them, the rendering engine will automatically switch to Cycles.
In Cycles renderer there are HDRIs (High Dynamic Range Image) and they are also a light source. The scene I have chosen uses only HDRI as light source and no other light source:
You can change the strength of the HDRI in this menu.
And as you can see, there's already a camera in the scene, but we don't need to use it because it's there for the chair:
You can just delete it and add a new camera like we did before.
Now we have a scene, camera and an HDRI light. We should bring our model from the other Blender file.
To do this go to File - Append - (Find your blender file) - Objects - [YourModel], [YourModel].001 and pose pack.
.001 one is the hairstyle that we have separated before.
After the appending, you should set the scene (Move models or other things in the scene)
If you move the sim, you must move the posepack rig with it or it will distort your model after it is attached.
When you attach them, you need to go to the Modifiers tab and reattach the pose pack rig to your model (both for [YourModel], [YourModel].001).
As you can see, there are some harsh lines on our model. We should fix them before rendering.
To do that we should select JUST body parts of our model
Don't forget to activate UV Sync Selection to make a selection from UV.
After the selection you should go to Mesh - Clean Up - Merge by Distance
And I hit the render button with current settings and this is the result:
Additional Lights
As you can see our render looks a little bit dark. You can add extra lights like we did before and make the scene lighter:
(This is just an example of course)
Rendering Samples
As we mentioned before rendering samples are more important for Cycles Renderer, especially big, complicated scenes.
Here is an example with lower samples and higher samples:
If you have a high-end PC, you can use higher samples, which is good for better results, but you can also use the "Denoising" feature.
With this feature, Blender will remove all the noise and it is perfect to use with mid-end or low-end PCs.
You can also take a look at faster rendering tutorials like this: https://www.youtube.com/watch?v=VEdd9CynwQU
Custom (External) Scenes
As you know there are many Blender scene creators like one of our artists Kiina Scenes.
All you need to do is download their .blend files, open them in Blender and use the exact same process with BlenderKit scenes.
I opened one of the Kiina's scene and I will import my model and take some renders:
As you can see, every scene requires another placement, we should select our sim and pose pack and move to right place and prepare to rendering.
After you have placed your model, you should select the right camera and hit CTRL+Numpad0:
These type of scenes generally requires a high-end PC, becuase of that, you should do all the arrangements in Material Edit mode, after you finish you can switch to render mode or directly render the scene:
You can create any type of renders with these steps. You can also take transparent objects renders, clothing mesh renders...etc. Here is a few final examples with different models:
I suggest you to use clean backgrounds to popup the model, not the background if you prepare a screen for your creation.
Related Articles
How To: Auto Height for Shoes
Set up your blender file We’re going to add a plane that will act as the mesh for the SlotRay which will allow for you to adjust the height of your shoes! Open your blend file that contains the shoes your wish to adjust. In the 3D View, press Shift + ...